
With Enterprise plan, you can configure SAML 2.0 SSO with AeriCast via Azure AD. The Azure AD will be acting as the IDP (Identify Provider), and AeriCast will be working as the SP(Service Provider).
Set up AeriCast & Azure AD:
First you need to do some set up in AeriCast:
If you don't have a sub domain yet, you can set up one by going to:
https://app.aericast.com/admin/branding-setting
Fill in subdomain field and click Activate. After that you can use this sub domain for SAML SSO.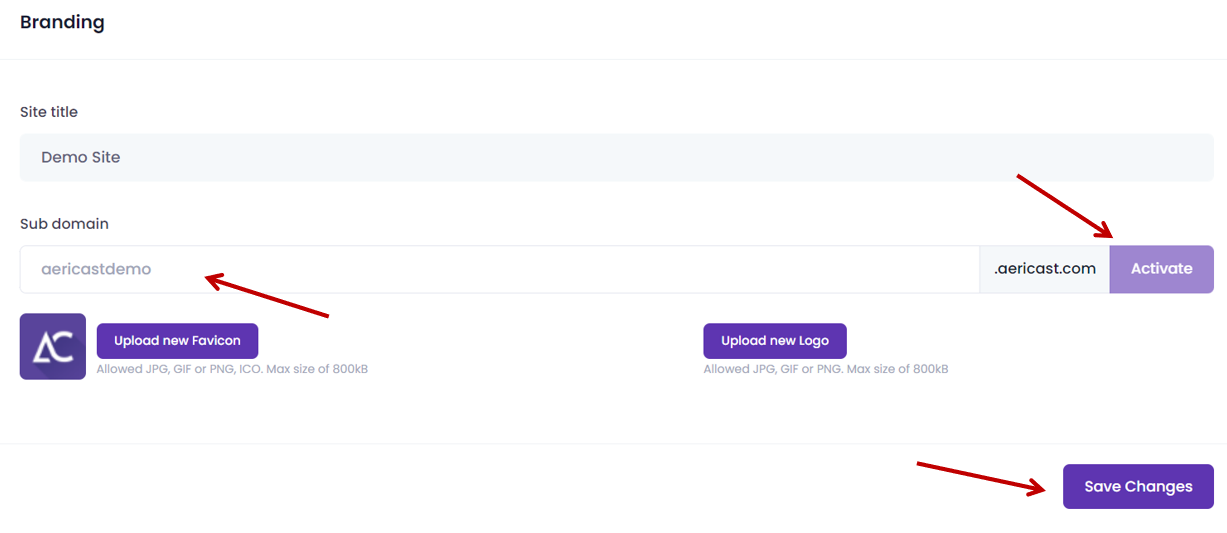
This will be the URL that you can share with your users so they can log in to use the app, once integration has set up. In our example we will use https://aericastdemo.aericast.com
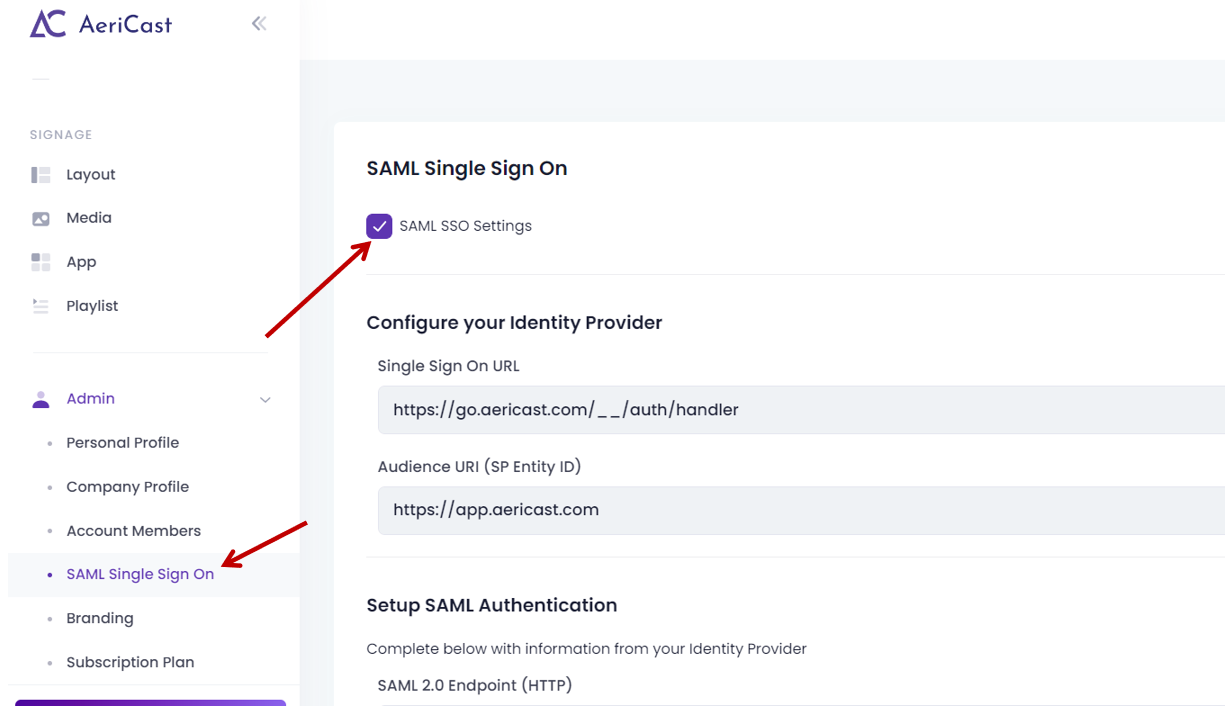
Next go to SAML Single Sign On setting page:
https://app.aericast.com/admin/saml-settings
Click Enable SAML SSO.
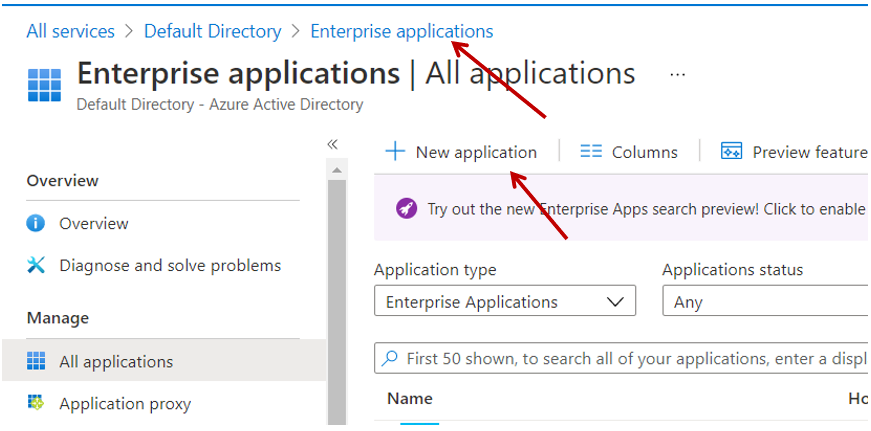
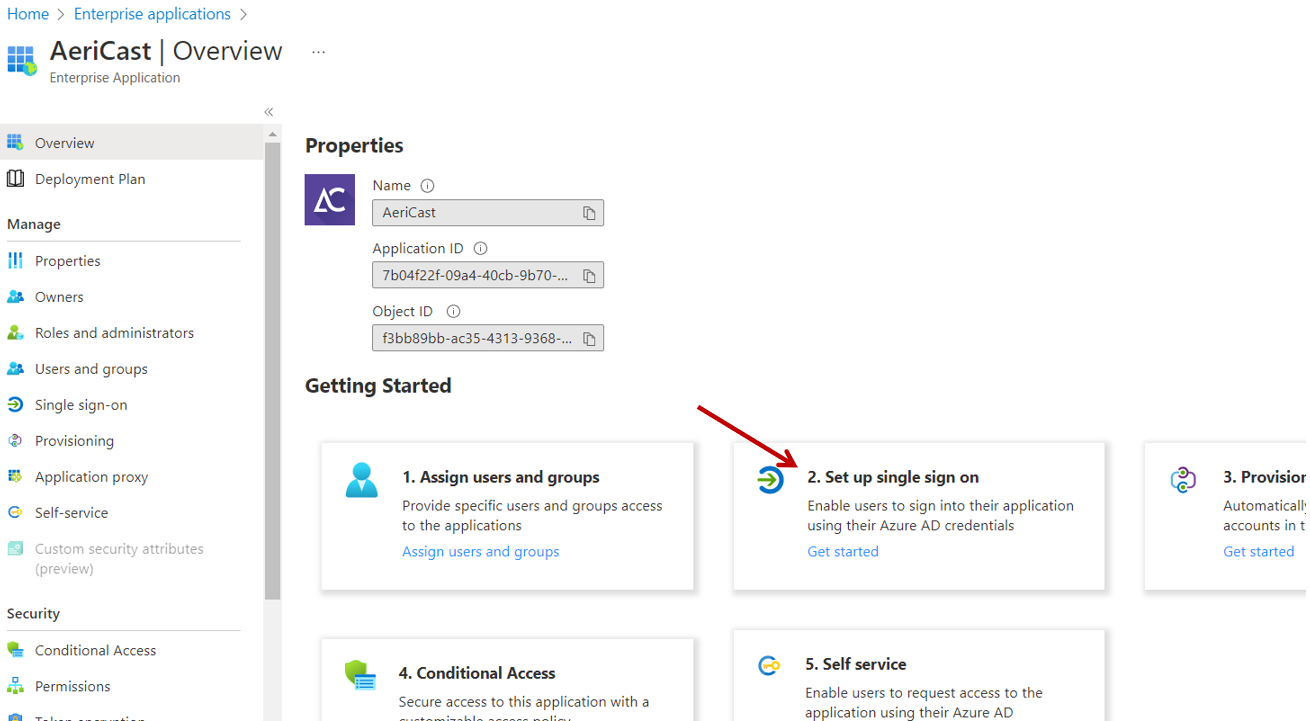
Next, add AeriCast as an App in your Azure AD portal:
Log in to your Azure AD portal as admin -> Enterprise applications
Click Add new application
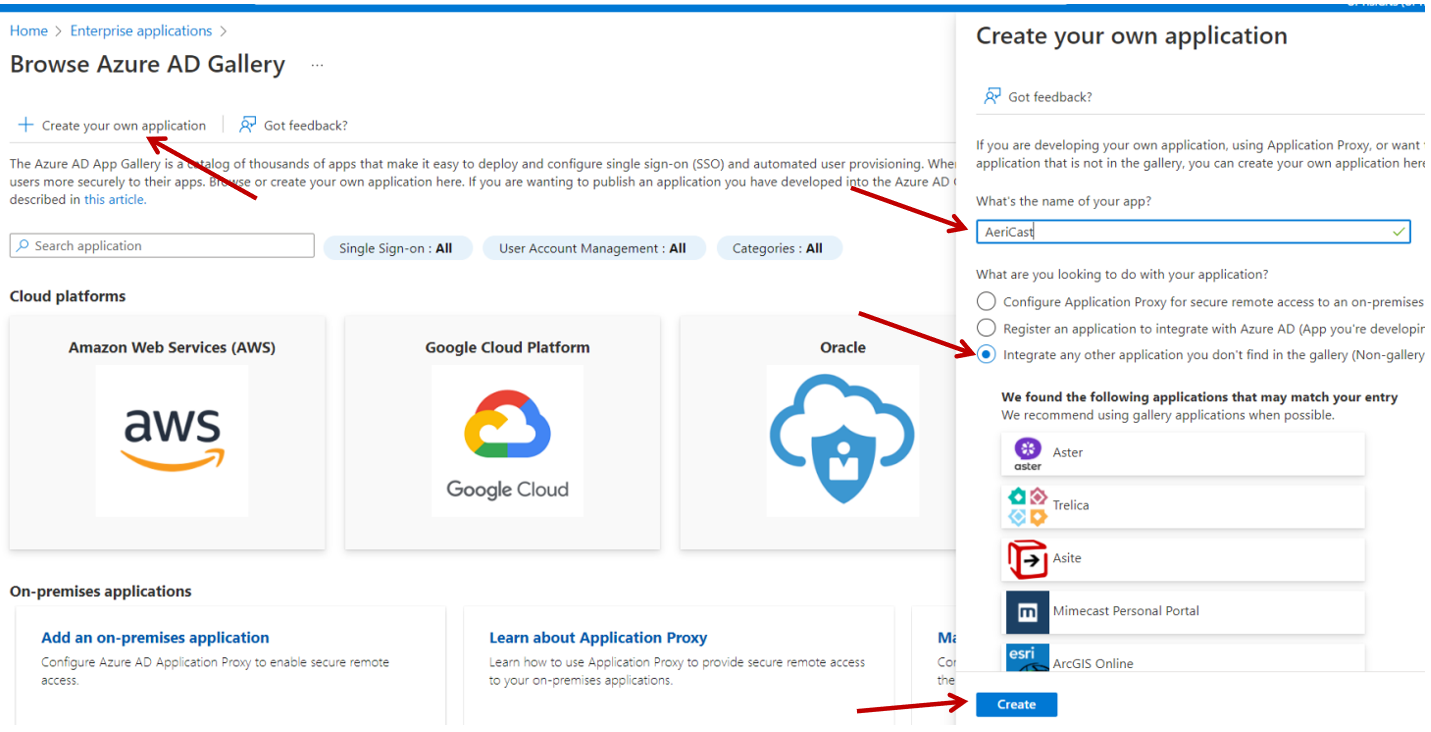
Select Create your own application, in the popup window, enter AeriCast as the name of the app, and choose integrate any other application you don't find in the gallery(Non-gallery). Then click create.
Click single sign on, to start setting up the SAML based SSO.
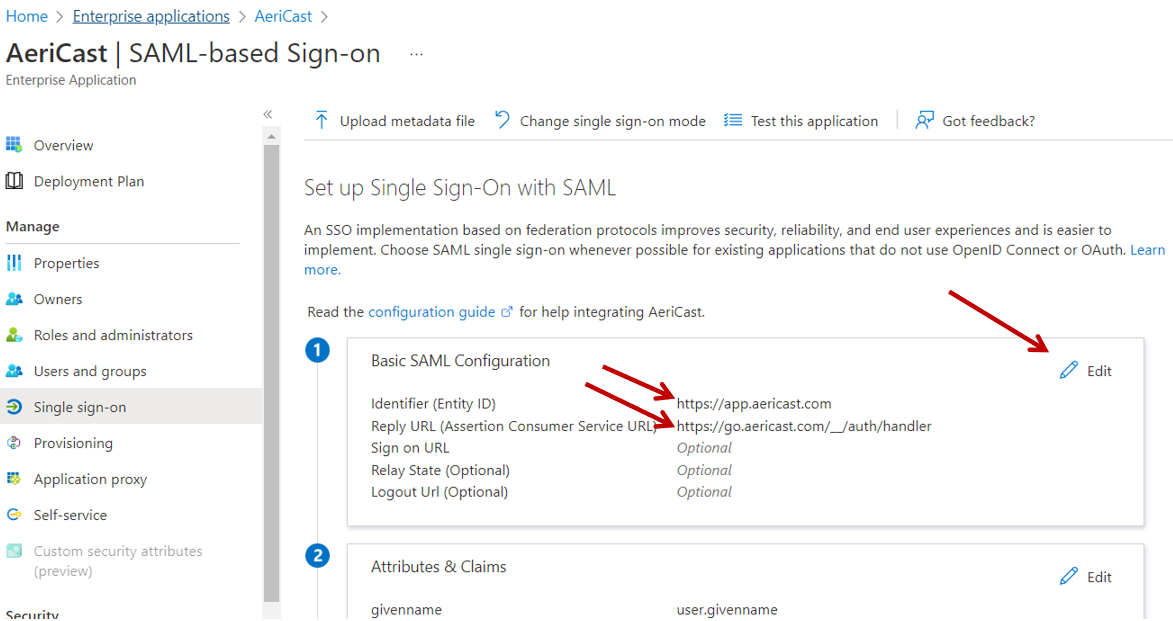
Click Edit of Basic SAML Configuration, this is where you should provide the Single Sign On URL, and SP Entity ID you get from your AeriCast SAML SSO setting.
Audience URI(SP Entity ID) from AeriCast SAML SSO setting should be put under Identifier.
Single Sign On URL from AeriCast SAML SSO setting should be put under Reply URL.
Then go to section SAML Signing Certificate and Set up AeriCast. Get the certificate and these 2 highlighted information, these need to be maintained in the AeriCast SAML SSO settings.
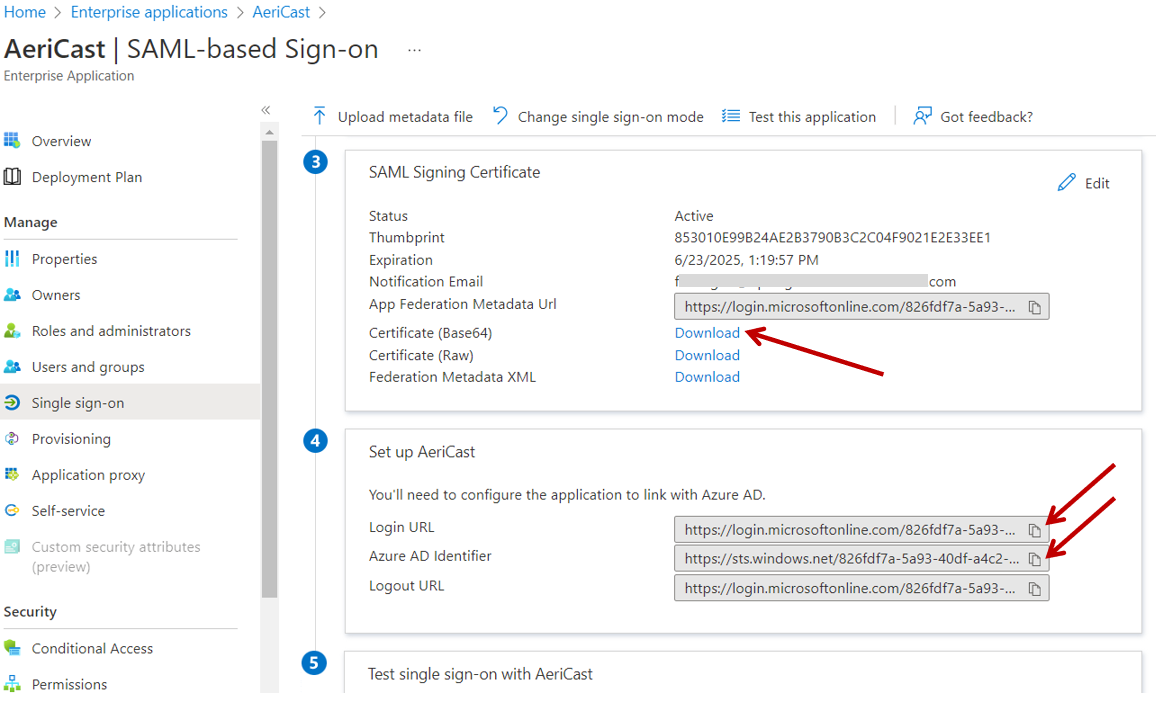
Go back to your AeriCast account and maintain above mentioned 3 fields, and save it.
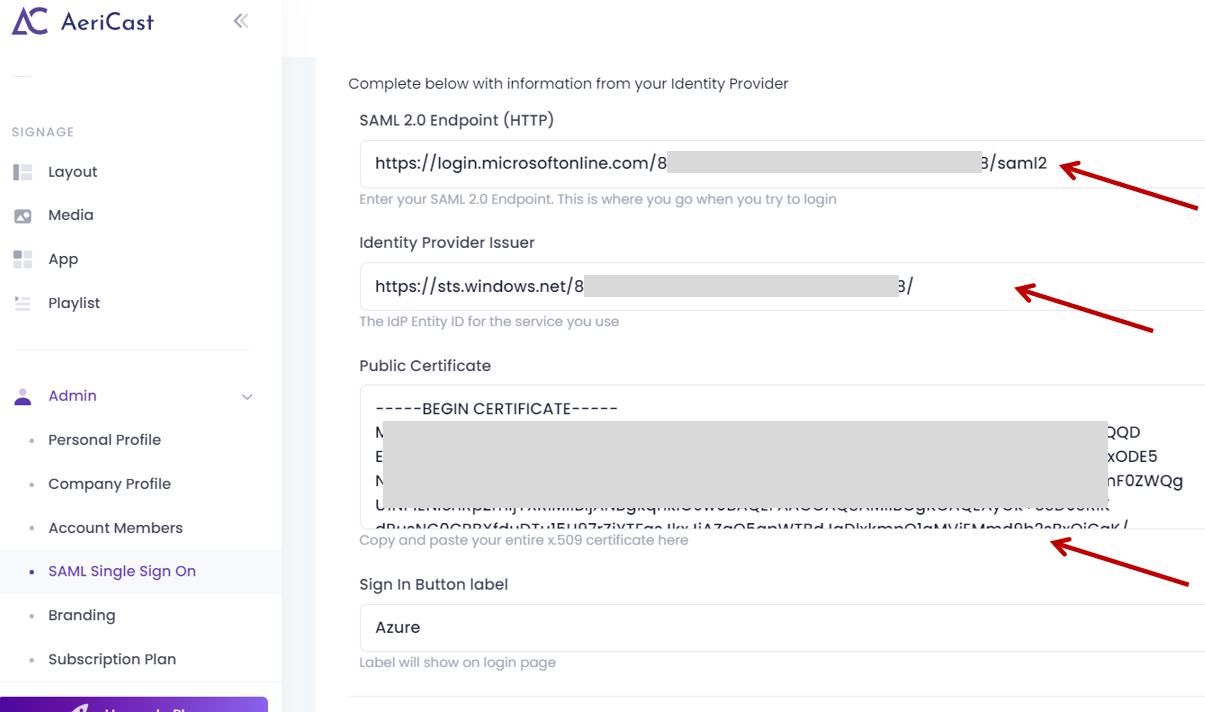
Put the User Access URL from Azure under SAML 2.0 Endpoint.
Put Azure AD Identifier under Identity Provider Issuer.
Put the content from downloaded base64 encoded public key under Public Certificate.
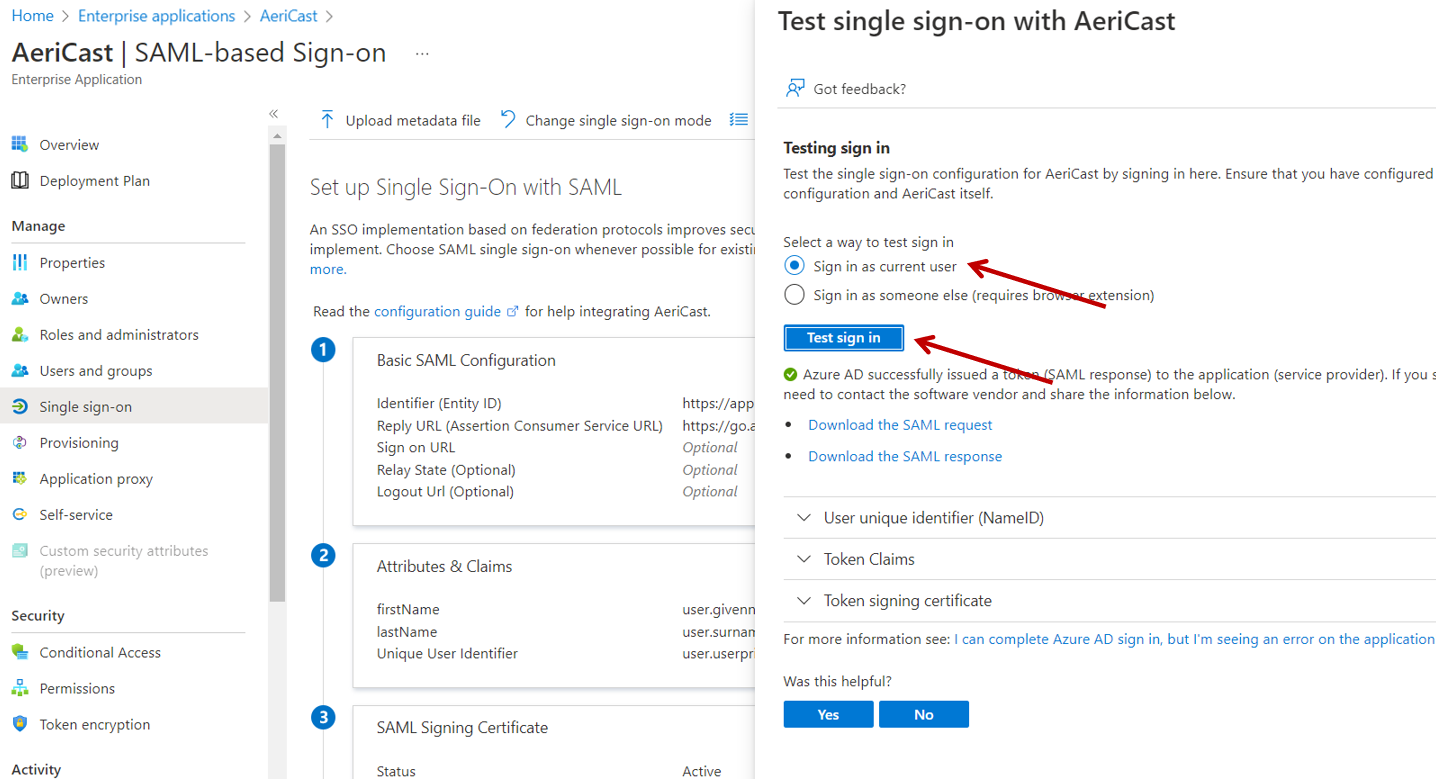
Then go back to the Azure AD portal, and click test in section Test single sign-on with AeriCast. It will show Azure AD is able to successfully issue SAML token to AeriCast.
Now your log in portal & integration is all set up.
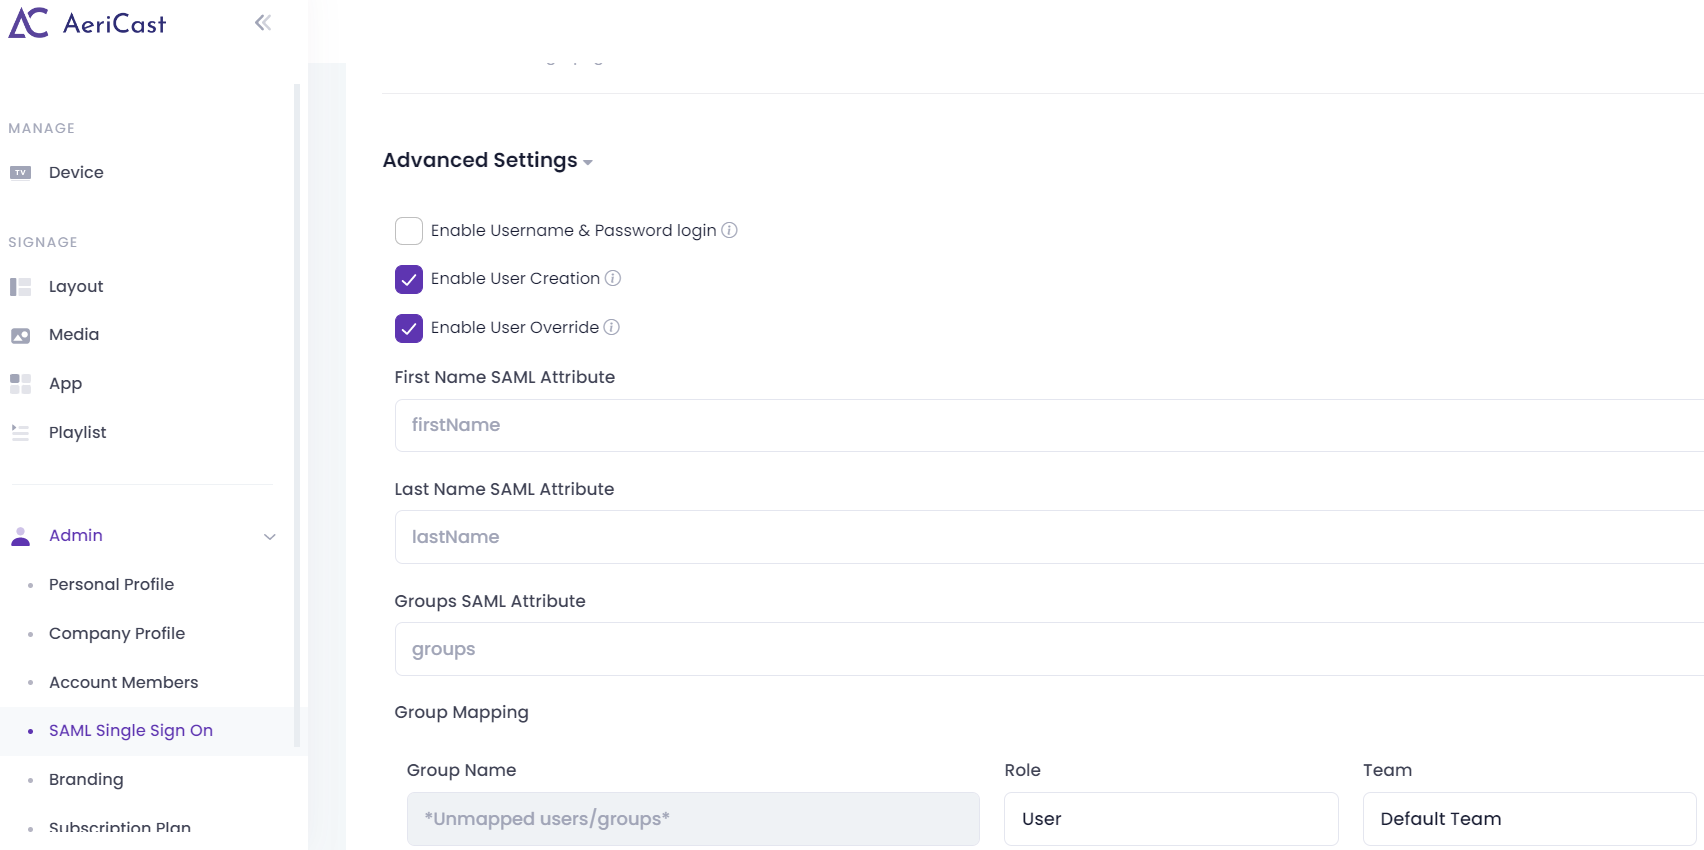
Advanced Setting:
Description of the configurations:
- Enable Username & Password login: Allow users to also log in with username/password. It’s recommended to disable once integration is all done. As Admin/Owner, it's recommended that you keep at least 1 account with password log in, in case there's issues, you can always log back in from app.aericast.com to reconfigure.
- Enable User Creation: If users are authenticated, but do not exist in AeriCast, they will be created in AeriCast. You should enable this, because you likely already assign/approve users/groups to use AeriCast, unless for some reason you want to be very strict and want to review roles of users before they can start using AeriCast.
- Enable User Override: Every time a user logs in, if their group assignment have changed on SAML, AeriCast will update, override new profile settings.
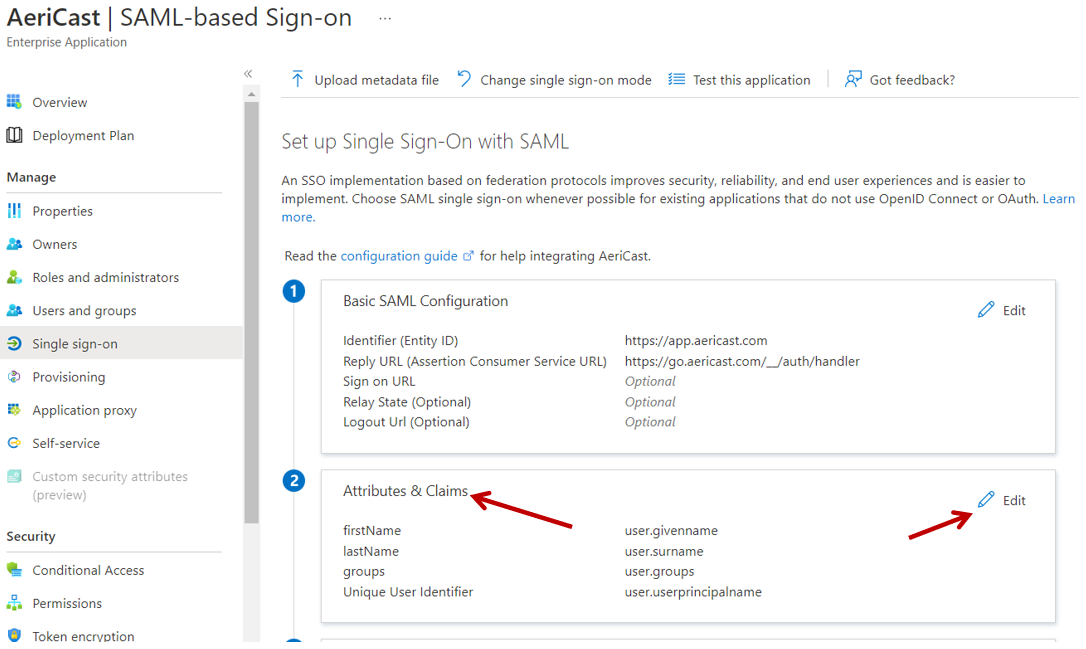
Attributes/Claims mapping:
AeriCast can take 3 attributes from the IDP. You can take the default attributes name used in AeriCast and get it mapped in Azure AD, or get the attributes/Claims name from Azure and map it in AeriCast.
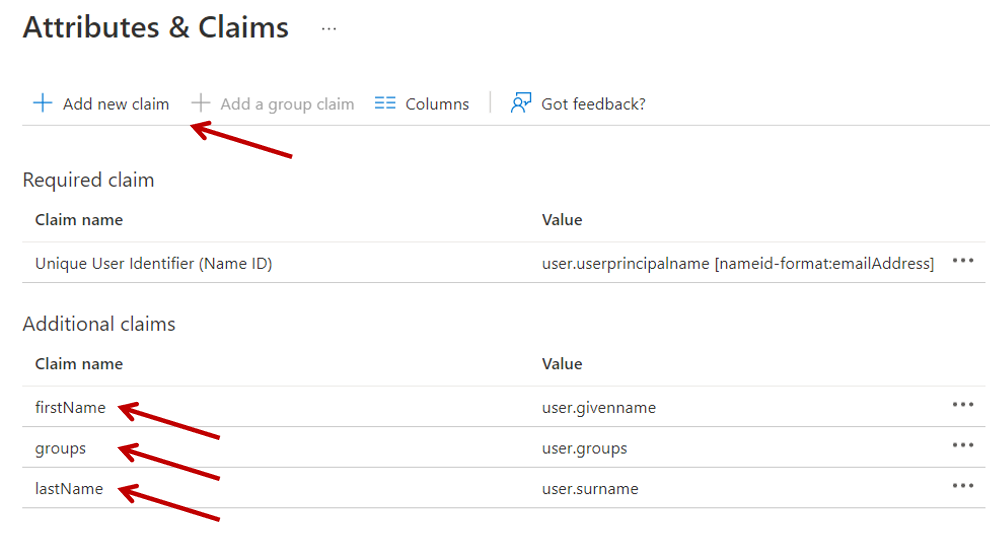
- First Name: use "firstName" as default attributes name.
- Last Name: use "lastName" as default attributes name.
- Groups: use "groups" as default attributes name.
To use the default attributes name from AeriCast and get it mapped in Azure AD. Go to Attibutes&Claimes in Azure and click edit.
Have the claims name mapped to the default attributes name used in AeriCast, if there is any claims missing, you can click Add new claim or Add a group claim to have it added here.
User Group & Role mapping:
You can maintain the mapping of your Azure AD user groups and AeriCast user roles.
Scroll to Advanced Settings and create mapping.
Group Name (group id in Azure AD), Role (role in AeriCast) mapping.
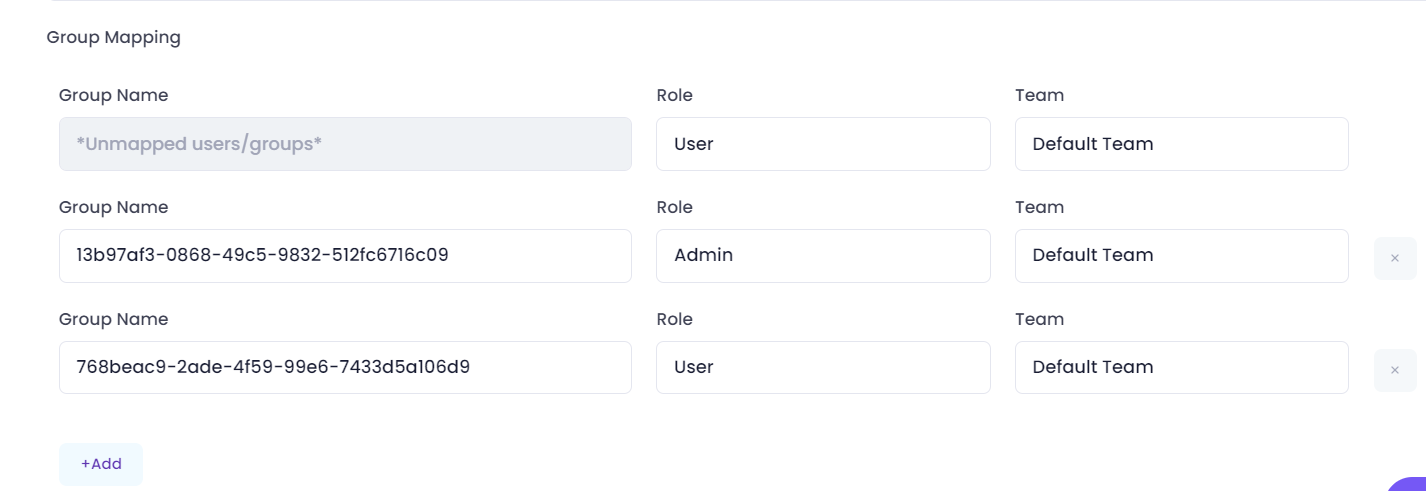
It's best practice to create group specifically for AeriCast with name prefix with aericast- and map to AeriCast like below:
- aericast-admins (SAML group) -> AeriCast role: Admin
- aericast-users (SAML group) -> AeriCast role: Users
- aericast-custom-role (SAML group) -> AeriCast custom role that you create
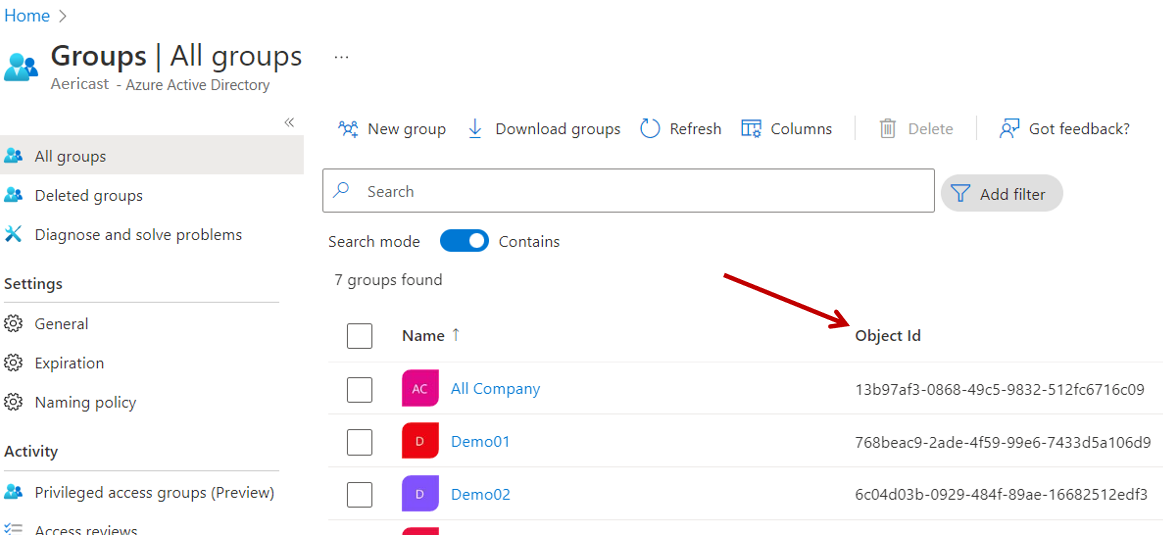
To set up the mapping, go to your Azure AD portal and get the Object ID of the group and maintain it in AeriCast.
That's all! Congratulation!
You have configured SAML 2.0 SSO for AeriCast with Azure AD.
Now your users can log in using the sub domain that you configured (in this case it was https://aericastdemo.aericast.com/signIn).
You can share the URL with your users and they can log in with their SSO credential.
If you have feedback on how to make the how-to guides better, please let us know at: support@aericast.com or just submit a ticket here.
Was this article helpful?
Articles in this section
- How to use AeriCast Client
- How to broadcast audio in wireless presentation?
- How to setup AeriCast Meet (Wireless Video Conferencing)?
- Display PowerPoint/Google Slides in whole screen when casting from MacBook Pro
- How to present from the Recent or Favorite Devices?
- How to unpair a device (screen)?
- Different between Instagram & Instagram Business App
- How to cast to multiple screens simultaneously
- How to set up SAML SSO with AeriCast and Azure AD
Add comment
Article is closed for comments.